在看到好友StringOD 的一篇博客《我的世界自定义配方脚本生成器》 之后,我有了些想法。
CraftTweaker是沙盒游戏Minecraft的一个Mod(Mod ification,模组,游戏的一种修改或增强程序),通过使用一种名为ZenScript的自定义脚本语言,修改游戏中的合成配方。
不过这个mod的最新版本是没有对应的GUI程序的,所以要生成想要的合成配方不是那么容易,得手动编写ZenScript脚本。StringOD的那篇博客中,用易语言实现了一个功能比较完善的GUI程序——AutoSpawnZScript。
恰好我在大四的第一个综合实践中使用过React+Antd来编写前端界面,而且之前用hexo-client 的时候了解到了Electron这个东西可以把web程序变为桌面应用程序,所以就想用React+Antd+Electron来尝试编写一下这个逻辑简单的脚本生成器,以巩固React的知识,以及学习一下Electron怎么用。
本文主要讲一下本项目(CraftTweaker-Assistant ,托管于gitee)的大致情况与设计思路。
参考链接
搭建环境 步骤概括起来大致是:
创建React项目
添加electron包
进行配置
详细内容可以参考上文给出的参考链接。因为参考链接说的很详细了,所以我这里就不用它们来凑字数了。
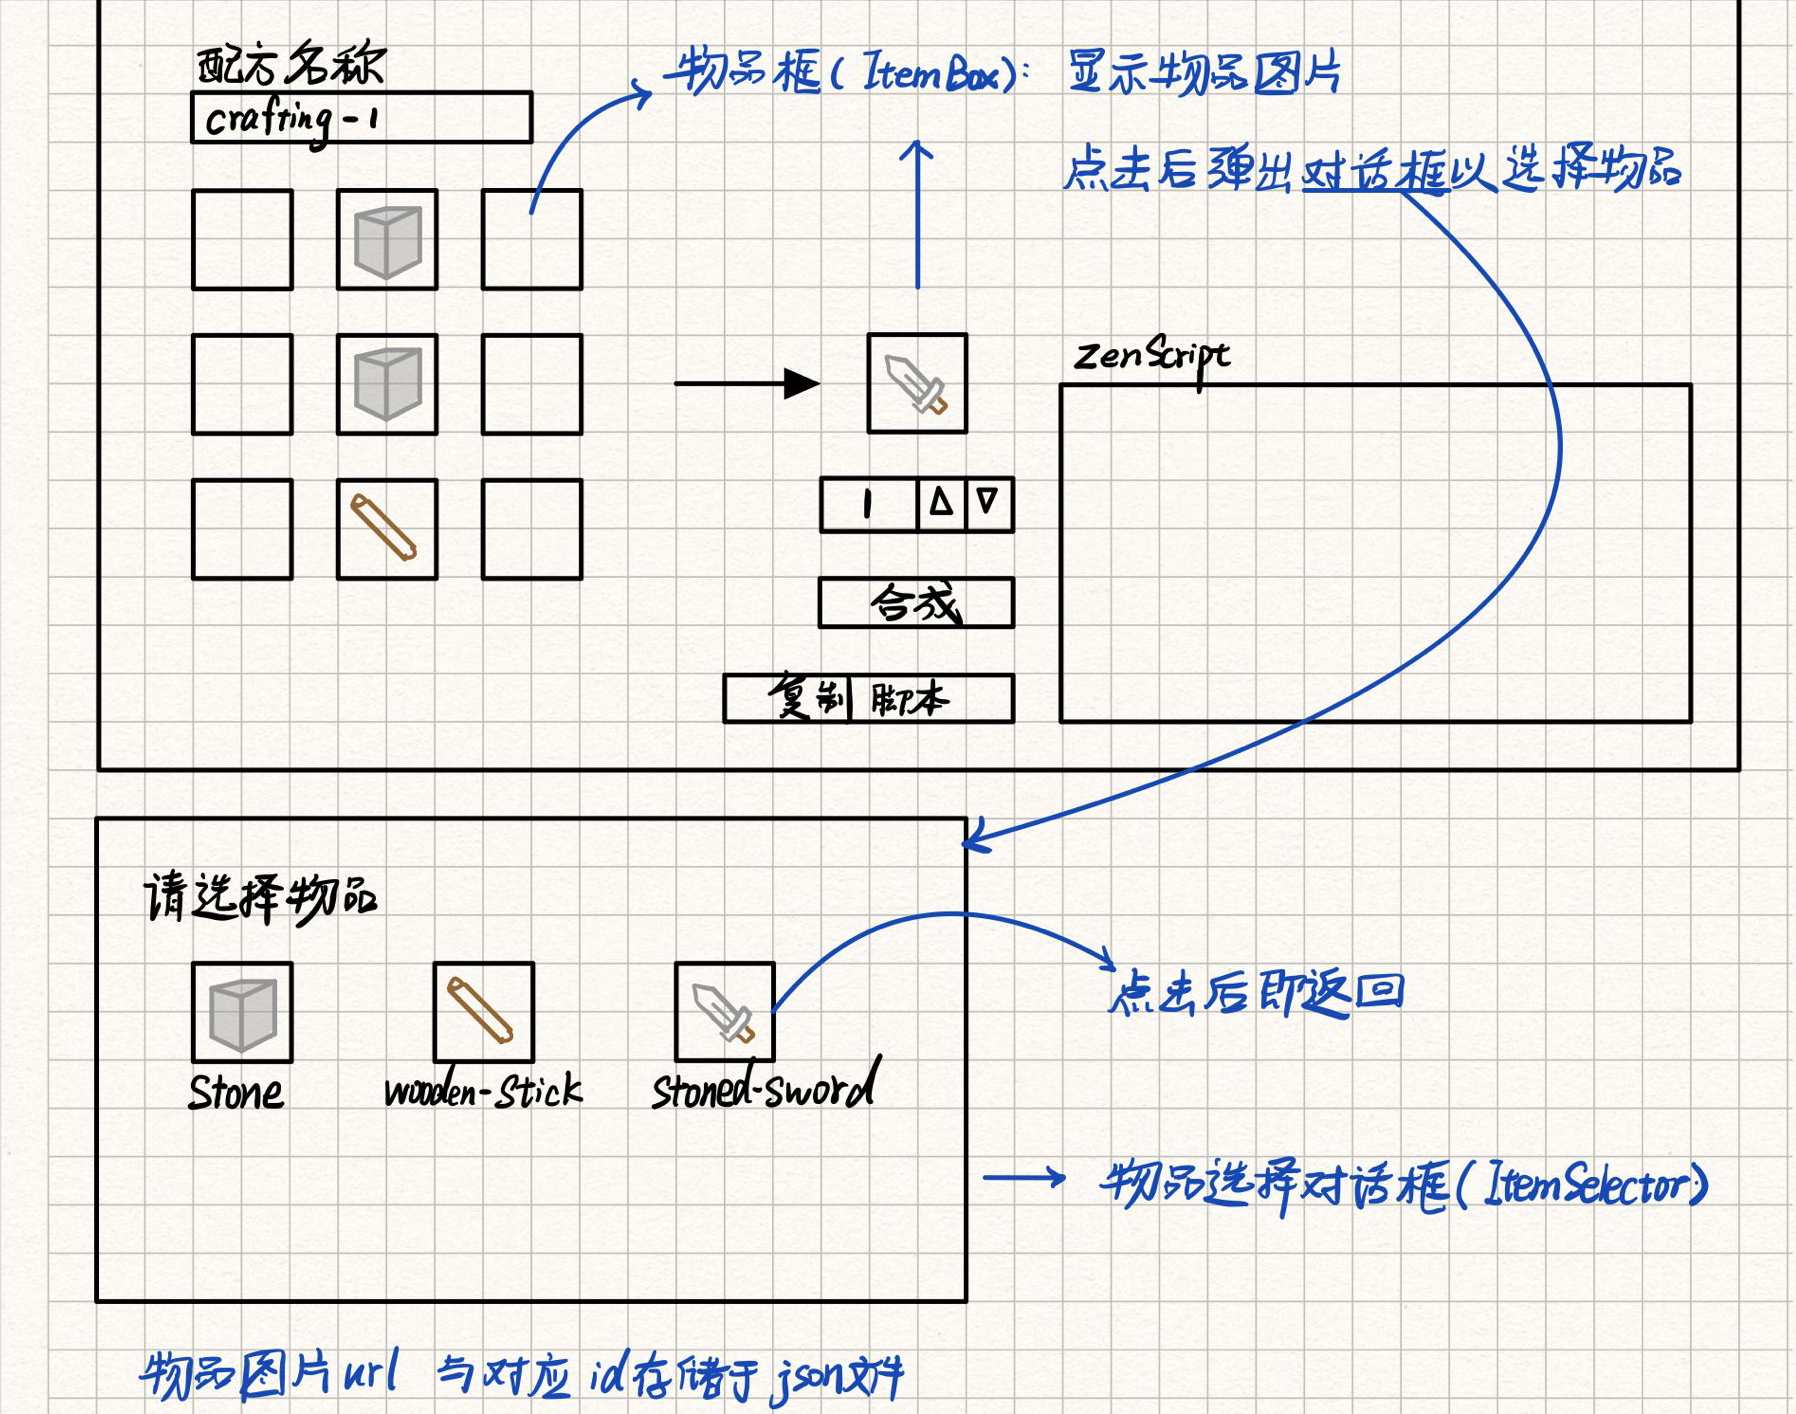
界面原型 我用ipad上面的notability绘制了一个简单的界面原型如下:
从这张图可以看到,我对StringOD的项目的界面做出的改进主要有:
第一,可以展示物品的图片,物品的名称则在鼠标悬停时出现的提示框中展示;
第二,选择物品不再是用列表或者下拉框,而是点选需要选择物品的格子之后,会弹出一个物品选择对话框,点击想要选择的物品之后就可以选择成功。
而物品选择对话框的数据则是从json文件中读取,我设定的文件规则如下:
1
2
3
4
5
6
7
{ "mod名" : { "物品名" : { "texture" : "物品材质图片url" } } }
用于测试的数据为:
itemsData.json 1 2 3 4 5 6 7 8 9 10 11 12 13 14 15 16 17 { "minecraft" : { "arrow" : { "texture" : "https://i.loli.net/2021/01/04/6LFr15vAUhzHESf.png" } , "flint" : { "texture" : "https://i.loli.net/2021/01/05/phzikbtaQ7qPGSV.png" } , "stick" : { "texture" : "https://i.loli.net/2021/01/05/La1Vd4TPo7RDZer.png" } , "feather" : { "texture" : "https://i.loli.net/2021/01/05/UQX4CoJ3EGmatHO.png" } } }
物品材质图片暂时使用上传到图床的图片,在以后的版本中,会兼容本地图片路径。
ZenScript简介 自定义合成配方,需要使用ZenScript编写如下的合成配方脚本(借用自StringOD 的《我的世界自定义配方脚本生成器》 ):
test.zs 1 2 3 4 5 6 7 8 9 10 11 12 13 14 15 16 17 18 19 20 craftingTable.addShapeless ("StringOD_LongDan" , <item :minecraft :dragon_egg> * 1 , [<item :minecraft :obsidian>, <item :minecraft :obsidian>, <item :minecraft :obsidian>, <item :minecraft :obsidian>, <item :minecraft :egg>, <item :minecraft :obsidian>, <item :minecraft :obsidian>, <item :minecraft :obsidian>, <item :minecraft :obsidian>]); craftingTable.addShapeless ("StringOD_ShuaGuaiXiang" , <item :minecraft :spawner> * 1 , [<item :minecraft :iron_bars>, <item :minecraft :iron_bars>, <item :minecraft :iron_bars>, <item :minecraft :iron_bars>, <item :minecraft :chest>, <item :minecraft :iron_bars>, <item :minecraft :iron_bars>, <item :minecraft :iron_bars>, <item :minecraft :iron_bars>]); craftingTable.addShapeless ("StringOD_LieYanFen" , <item :minecraft :blaze_powder> * 9 , [<item :minecraft :lava_bucket>, <item :minecraft :lava_bucket>, <item :minecraft :lava_bucket>, <item :minecraft :lava_bucket>, <item :minecraft :stick>, <item :minecraft :lava_bucket>, <item :minecraft :lava_bucket>, <item :minecraft :lava_bucket>, <item :minecraft :lava_bucket>]); craftingTable.addShapeless ("StringOD_NiuDan" , <item :minecraft :cow_spawn_egg> * 1 , [<item :minecraft :beef>, <item :minecraft :beef>, <item :minecraft :beef>, <item :minecraft :beef>, <item :minecraft :egg>, <item :minecraft :beef>, <item :minecraft :beef>, <item :minecraft :beef>, <item :minecraft :beef>]); craftingTable.addShapeless ("StringOD_ShiLaiMuDan" , <item :minecraft :slime_spawn_egg> * 1 , [<item :minecraft :slime_ball>, <item :minecraft :slime_ball>, <item :minecraft :slime_ball>, <item :minecraft :slime_ball>, <item :minecraft :egg>, <item :minecraft :slime_ball>, <item :minecraft :slime_ball>, <item :minecraft :slime_ball>, <item :minecraft :slime_ball>]); craftingTable.addShapeless ("StringOD_EHunZhiLei" , <item :minecraft :ghast_tear> * 9 , [<item :minecraft :milk_bucket>]); craftingTable.addShapeless ("StringOD_MoYingRenDan" , <item :minecraft :enderman_spawn_egg> * 1 , [<item :minecraft :ender_pearl>, <item :minecraft :ender_pearl>, <item :minecraft :ender_pearl>, <item :minecraft :ender_pearl>, <item :minecraft :egg>, <item :minecraft :ender_pearl>, <item :minecraft :ender_pearl>, <item :minecraft :ender_pearl>, <item :minecraft :ender_pearl>]);
将其保存为扩展名为.zs的文件例如test.zs,并将其置于游戏主目录的scripts目录下(前提是你得安装了CraftTweaker 这个mod),启动游戏,就能使用你的新合成表了。
你可以在游戏中使用/reload命令来重新加载脚本,从而不必每次重开游戏来调试新写的zs脚本。
minecraft的配方是由9个材料物品堆和1个成品物品堆构成的,并且分为三种类型:无序配方(Shapeless ),有序配方(Shaped ),镜像有序配方(Shaped Mirrored )。
在游戏中,它们之间的区别在于,物品在合成台的九宫格内摆放的形状会不会影响合成的物品的类型和数目。
而在zenscript中,他们的区别在于调用的函数不同,以及原料的参数编写方式不太一样。
无序配方:
1 2 3 craftingTable.addShapeless ("shapeless_example_2" , <item :minecraft :grass> * 8 , [<item :minecraft :wheat_seeds>, <item :minecraft :dirt>, <item :minecraft :dirt>, <item :minecraft :dirt>, <item :minecraft :dirt>, <item :minecraft :dirt>, <item :minecraft :dirt>, <item :minecraft :dirt>, <item :minecraft :dirt>]);
有序配方:
1 2 3 4 5 6 craftingTable.addShaped ("shaped_example_1" , <item :minecraft :arrow>, [ [<item :minecraft :diamond>, <item :minecraft :diamond>], [<item :minecraft :air>, <item :minecraft :flint>], [<item :minecraft :air>, <item :minecraft :flint>] ]);
有序镜像配方:
1 2 3 4 5 6 craftingTable.addShapedMirrored ("shaped_mirror_example_1" , <item :minecraft :arrow> * 2 , [ [<item :minecraft :diamond>, <item :minecraft :diamond>], [<item :minecraft :air>, <item :minecraft :flint>], [<item :minecraft :air>, <item :minecraft :flint>] ]);
组件设计与实现 本项目的组件有三个:
CraftTable(合成台):用于容纳主要功能组件ItemBox(物品框):合成台组件的主要组成部分,用于展示物品图片,并响应点击事件以弹出物品选择对话框ItemSelector(物品选择器):即物品选择对话框
同时需要用到一个普通的非组件类来封装物品相关数据,这里沿用了CraftTweaker的官方文档 中的命名,即ItemStack(物品堆)。
之所以是物品堆,是因为除了保存物品本身的信息之外,还需要保存物品堆叠的数目,在minecraft中,一个物品框中是可以堆叠多个物品的。
ItemStack物品堆 该类封装了物品的几个基本属性(更多属性以后再加),以及物品当前堆叠数目,默认值为“1个空气物品”,即什么都没有。空气(<item:minecraft:air>即代表空)。
比较简单,故直接上代码:
src\entity\ItemStack.js 1 2 3 4 5 6 7 8 9 10 11 12 13 14 15 16 17 18 19 20 21 22 23 24 25 26 27 28 29 30 class ItemStack { constructor (modName = 'minecraft' , itemName = 'air' , texture = '' , amount = 1 ) { this .modName = modName; this .itemName = itemName; this .texture = texture; this .amount = amount; } toString ( if (this .itemName && this .modName ) { return `<item:${this .modName} :${this .itemName} >` ; } else { return '' ; } } } export default ItemStack ;
ItemBox物品框 物品框用于展示物品,它目前只有一个state(状态):ItemStack,用于表明当前物品框内是什么物品,以及堆叠数目。
使用antd的方形头像框来模拟合成台的物品框,鼠标悬停提示框内显示物品名称。
src\components\ItemBox.jsx 1 2 3 4 5 6 7 8 9 10 11 12 13 14 15 16 17 18 19 20 21 22 23 24 25 26 27 28 29 30 31 32 33 34 35 36 37 38 39 40 41 42 43 import React , { Component } from "react" ;import { Avatar } from "antd" ;import { CodeSandboxOutlined } from "@ant-design/icons" ;import ItemStack from "../entity/ItemStack" ;import { Tooltip } from 'antd' ;class ItemBox extends Component { constructor (props ) { super (props); this .state = { itemStack :props.itemStack || new ItemStack (), }; } componentWillReceiveProps (nextProps ){ this .setState ({ itemStack :nextProps.itemStack || new ItemStack () }); } render ( return ( <Tooltip title ={this.state.itemStack.toString()} > <Avatar shape ="square" size ="large" src ={this.state.itemStack.texture} icon ={ <CodeSandboxOutlined /> } {...this.props} > {this.state.itemStack.itemName} </Avatar > </Tooltip > ); } } export default ItemBox ;
ItemSelector物品选择器 这个物品选择器,就是点击物品框之后弹出的那个用于选择物品的对话框。
它需要读取存储着物品数据的json文件来加载物品框,普通的js是不能读取本地文件的,需要用到nodejs的文件模块:
1 const fs = require ("fs" );
但是直接这样导入,是没办法使用里面的函数的,会报错说该模块没有某某函数。
查了一圈资料(资料的链接忘记保存了),得到下面这个解决方案:
1 const fs = window .require ("fs" );
不过这样会导致你从localhost:3000打开的这个项目会报错,不要紧,因为你用electron打开的是可以用的。
还有一个问题,就是如果使用异步的fs.readFile()函数,则会产生一个很奇怪的现象,那就是文件读取时好时坏。
有的时候可以正常工作,而下一次打开有可能就无法读取文件了,使用console.log发现这个函数前面的内容都能执行,但是它就是不调用我给它的回调函数。
但是我改成使用同步的fs.readFileSync()函数后,问题得到了解决,但我还是不明白为什么会出现这种情况。
其代码如下:
src\components\ItemSelector.jsx 1 2 3 4 5 6 7 8 9 10 11 12 13 14 15 16 17 18 19 20 21 22 23 24 25 26 27 28 29 30 31 32 33 34 35 36 37 38 39 40 41 42 43 44 45 46 47 48 49 50 51 52 53 54 55 56 57 58 59 60 61 62 63 64 65 66 67 68 69 70 71 72 73 74 75 76 77 78 79 80 81 82 83 84 85 86 87 88 89 90 91 92 import React , { Component } from "react" ;import { Modal , Button ,Spin } from "antd" ;import ItemStack from "../entity/ItemStack" ;import ItemBox from "./ItemBox" ;const fs = window .require ("fs" );class ItemSelector extends Component { constructor (props ) { super (props); this .state = { loading :true , itemList :[new ItemStack ()], onSelectItem :props.onSelectItem , }; } componentDidMount ( this .readItemList (); } readItemList=(fileName='itemsData.json' )=> { console .log (fileName); let data = fs.readFileSync (fileName); this .initSelectorByJsonString (data); } initSelectorByJsonString=(data )=> { let itemList = [new ItemStack ()]; let jsonObject = JSON .parse (data); for (let modName in jsonObject){ for (let itemName in jsonObject[modName]){ itemList.push (new ItemStack (modName,itemName,jsonObject[modName][itemName].texture )); } } this .setState ({ loading :false , itemList :itemList, }); } render ( return ( <Modal title ="选择物品" footer ={null} {...this.props } > <Spin spinning ={this.state.loading} tip ="加载物品列表中,请稍候" > { this.state.itemList.map((item,index)=>{ return ( <ItemBox key ={index} itemStack ={item} onClick ={() => this.state.onSelectItem(item)}/> ) }) } </Spin > <p > {this.state.loading}</p > </Modal > ); } } export default ItemSelector ;
CraftTable合成台 该组件用于将物品框等主要功能组件组合起来,进行布局,以及存储当前已经设置的配方。
它的state为:
state
简介
isItemSelectorVisible
物品选择器是否可见
itemList
元素为ItemStack的数组,下标0为输出框,1~9为原料框
curIndex
当前选择的物品框下标,-1为未选择
recipeName
配方名称
recipeType
配方类型,0-无序,1-有序,2-镜像有序
zenscript
生成的zs脚本
它提供了一个方法onSelectItem(),参数为ItemStack类型,作为子组件ItemSelector的选择物品回调函数。
代码如下(比较长,可以点击代码块左上角图标以折叠):
src\components\CraftTable.jsx 1 2 3 4 5 6 7 8 9 10 11 12 13 14 15 16 17 18 19 20 21 22 23 24 25 26 27 28 29 30 31 32 33 34 35 36 37 38 39 40 41 42 43 44 45 46 47 48 49 50 51 52 53 54 55 56 57 58 59 60 61 62 63 64 65 66 67 68 69 70 71 72 73 74 75 76 77 78 79 80 81 82 83 84 85 86 87 88 89 90 91 92 93 94 95 96 97 98 99 100 101 102 103 104 105 106 107 108 109 110 111 112 113 114 115 116 117 118 119 120 121 122 123 124 125 126 127 128 129 130 131 132 133 134 135 136 137 138 139 140 141 142 143 144 145 146 147 148 149 150 151 152 153 154 155 156 157 158 159 160 161 162 163 164 165 166 167 168 169 170 171 172 173 174 175 176 177 178 179 180 181 182 183 184 185 186 187 188 189 190 191 192 193 194 195 196 197 198 199 200 201 202 203 204 205 206 207 208 209 210 import React , { Component } from "react" ;import { Row , Col , Space , Tooltip , Card } from "antd" ;import ItemBox from "./ItemBox" ;import { ArrowRightOutlined ,CopyOutlined } from "@ant-design/icons" ;import ItemSelector from "./ItemSelector" ;import ItemStack from "../entity/ItemStack" ;import { Input } from 'antd' ;import { InputNumber ,Button } from 'antd' ;import { Select } from 'antd' ;import { message } from 'antd' ;const { Option } = Select ;const { TextArea } = Input ;class CraftTable extends Component { constructor (props ) { super (props); let itemList = []; for (let i = 0 ; i <= 9 ; i++) { itemList.push (new ItemStack ()); } this .state = { isItemSelectorVisible : false , itemList : itemList, curIndex :-1 , recipeName :'' , recipeType :0 , zenscript :'' , }; } openItemSelector = (index ) => this .setState ({ isItemSelectorVisible : true ,curIndex :index}); closeItemSelector = () => this .setState ({ isItemSelectorVisible : false }); onSelectItem = (item ) => { if (this .state .curIndex ===-1 ) return ; let itemList = this .state .itemList ; itemList[this .state .curIndex ] = item; console .log (item); this .setState ({ isItemSelectorVisible :false , itemList :itemList, },()=> { console .log (this .state .itemList ); }) }; onRecipeInputChange=(e )=> { this .setState ({ recipeName :e.target .value }) } onAmountInputChange=(value )=> { let itemList = this .state .itemList ; itemList[0 ].amount = value; this .setState ({ itemList :itemList }); } onRecipeTypeChange=(value )=> { this .setState ({ recipeType :value }) } createRecipeZenScript=()=> { if (!this .state .recipeName ){ message.error ('请输入配方名' ); return ; } let zenscript = '' ; let ingredients ='' ; let outputItemStr = this .state .itemList [0 ].toString (); if (this .state .itemList [0 ].amount !==1 ) outputItemStr += '*' + this .state .itemList [0 ].amount ; let a = this .state .itemList ; switch (this .state .recipeType ){ case 0 :default : this .state .itemList .map ((itemStack,index )=> { if (index!==0 ) ingredients+=',' ingredients+=itemStack.toString (); }) zenscript = `craftingTable.addShapeless("${this .state.recipeName} ",${outputItemStr} ,[${ingredients} ]);` break ; case 1 : ingredients=`[${a[1 ].toString()} ,${a[2 ].toString()} ,${a[3 ].toString()} ],[${a[4 ].toString()} ,${a[5 ].toString()} ,${a[6 ].toString()} ],[${a[7 ].toString()} ,${a[8 ].toString()} ,${a[9 ].toString()} ]` zenscript = `craftingTable.addShaped("${this .state.recipeName} ",${outputItemStr} ,[${ingredients} ]);` break ; case 2 : ingredients=`[${a[1 ].toString()} ,${a[2 ].toString()} ,${a[3 ].toString()} ],[${a[4 ].toString()} ,${a[5 ].toString()} ,${a[6 ].toString()} ],[${a[7 ].toString()} ,${a[8 ].toString()} ,${a[9 ].toString()} ]` zenscript = `craftingTable.addShapedMirrored("${this .state.recipeName} ",${outputItemStr} ,[${ingredients} ]);` break ; } this .setState ({ zenscript :zenscript }); } onCopy=(e )=> { } render ( return ( <div > <ItemSelector visible ={this.state.isItemSelectorVisible} onSelectItem ={this.onSelectItem} onCancel ={this.closeItemSelector} /> <Row > <label > 配方名称</label > <Input size ="small" onChange ={this.onRecipeInputChange}/ > </Row > <br /> <Row > <Space > <Col > <ItemBox key ={1} itemStack ={this.state.itemList[1]} onClick ={() => this.openItemSelector(1)} /> </Col > {/* 中间省略9个重复的格子*/} <Col > <Tooltip title ="成品数目" > <InputNumber min ={1} defaultValue ={1} size ="small" onChange ={this.onAmountInputChange}/ > </Tooltip > </Col > </Space > </Row > <br /> <Row > <label > 配方类型:</label > <Select defaultValue ={0} style ={{ width: 120 }} onChange ={this.onRecipeTypeChange} > <Option value ={0} > 无序</Option > <Option value ={1} > 有序</Option > <Option value ={2} > 有序镜像</Option > </Select > </Row > <br /> <Row > <Space > <Col > <Button type ="primary" shape ="round" onClick ={this.createRecipeZenScript} > 合成 </Button > </Col > <Col > <Button id ='copy' type ="primary" shape ="round" icon ={ <CopyOutlined /> }onClick={this.onCopy}> 复制脚本 </Button > </Col > </Space > </Row > <br /> <Card > {this.state.zenscript} </Card > </div > ); } } export default CraftTable ;
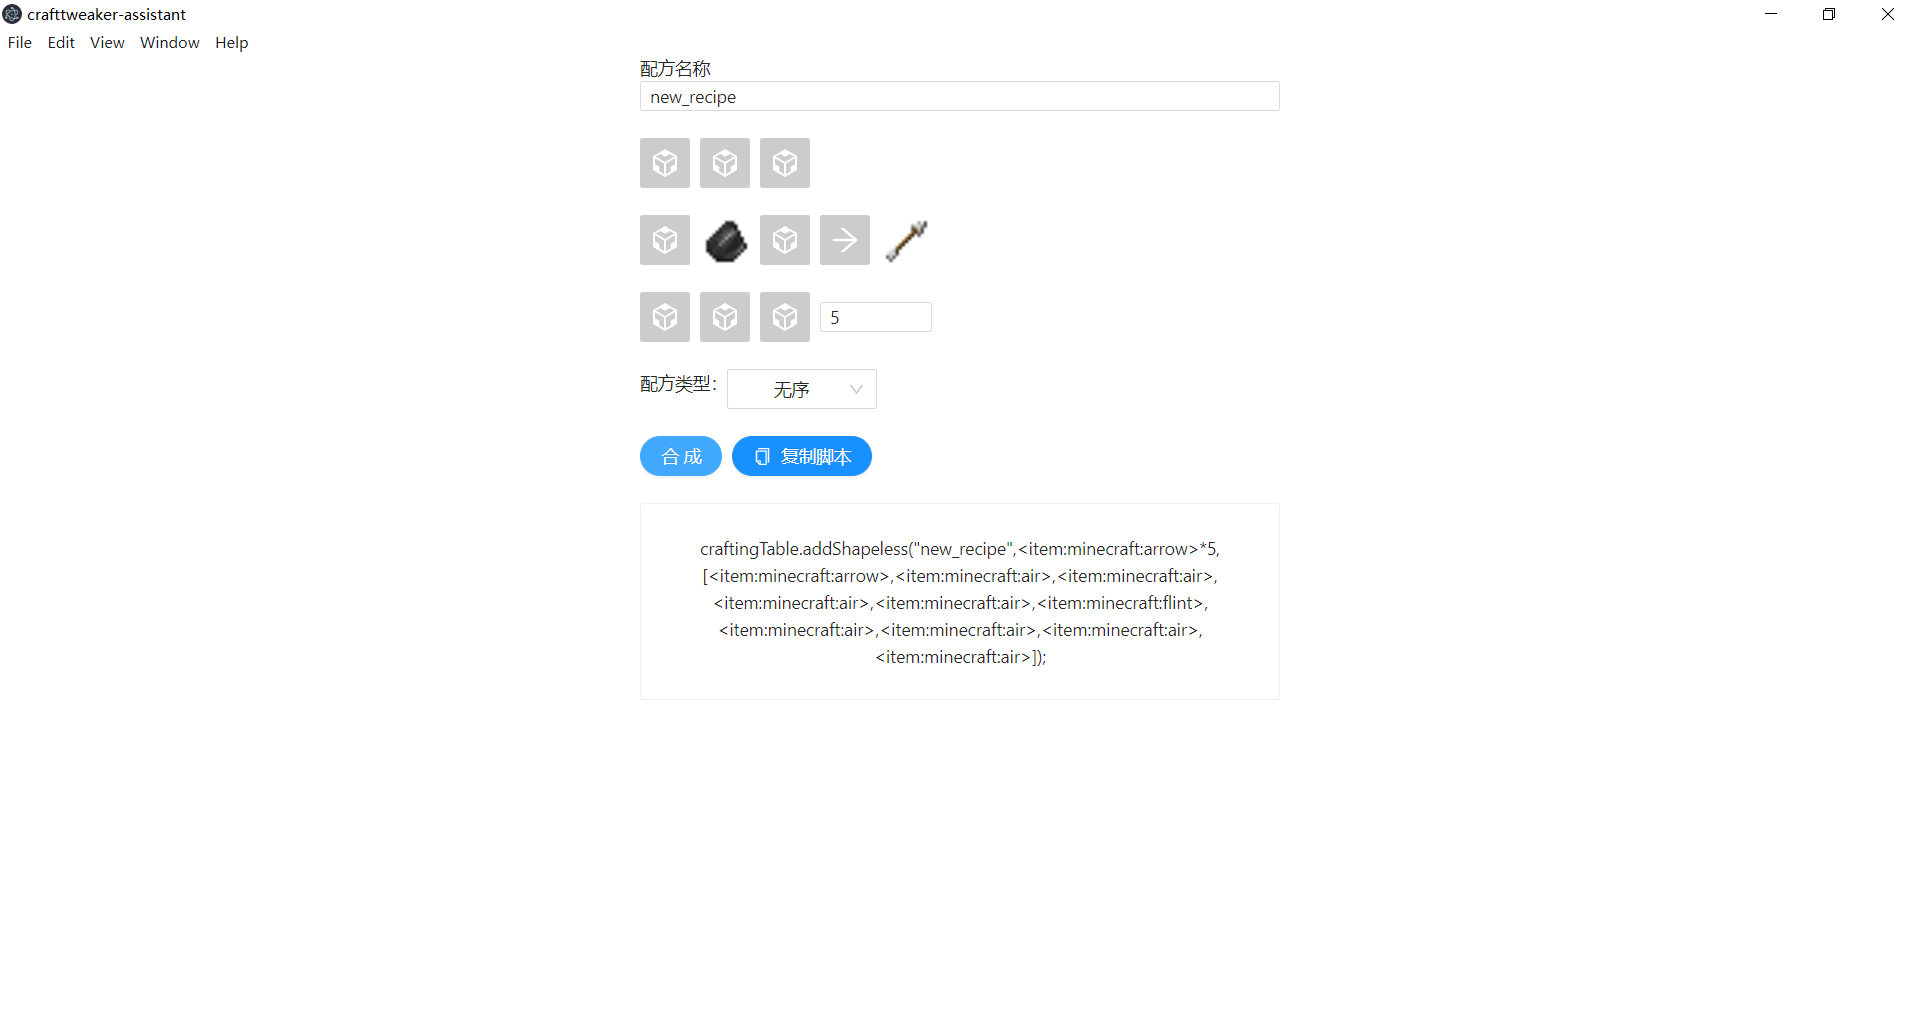
最终效果图
写在最后 本文主要讲的是CraftTweaker-Assistant 这个项目的大致情况,以及遇到的一些问题。这个项目逻辑比较简单,主要是让我巩固一下React的相关知识。
现在完成的是最初的版本,只实现了最基本的功能,后续如果有时间,可能会和StringOD一起继续更新。